.screenrc

What you do when you’ve been slack and haven’t posted for months? You think of something interesting to say. What do you do when your mind goes blank? You post a screen shot or a dot file. As a bonus, here’s both:

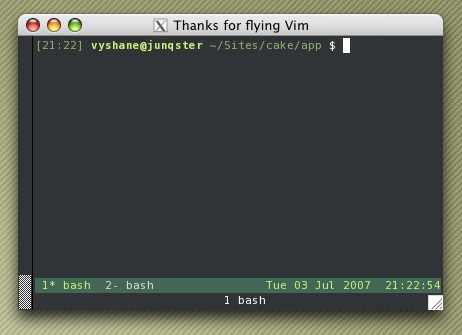
Screen shot of my xterm session in OS X:

And here’s my .screenrc file:

activity "activity: window ~%"
vbell_msg "bell: window ~%"
vbellwait 2
allpartial off
autodetach on

chdir
defscrollback 500
startup_message off
sessionname shane
altscreen on
bindkey -k kD stuff \177
shell -$SHELL

# Status and caption at the bottom of the terminal
hardstatus on
hardstatus alwayslastline
hardstatus string "%= %3n %t%? [ %h ]%? %="
caption string '%{= kW}%-Lw%{= kG}%50> %n%f* %t%{= kW}%+Lw%< %{= kG}%-=%D %d %M %Y  %c:%s%{-}'
caption always

# Window numbering starts at 1
bind c screen 1
bind 0 select 10
screen 1

Full Post + Comments

Rediscovering Mylène Farmer

I first discovered Mylène Farmer in 1996, when I was still in high school. I remember watching a French charity event on television in which she performed the song Rêver (to dream) live. I was mesmerised by her beauty and her voice, by the emotion she displayed in the performance (she cried).

So here we are, ten years later. These days we tend to take search engines and video sharing sites for granted. Ten years ago I wished that I’d taped the show so I could experience it again.

I give you Rêver, by Mylène Farmer, in Les Enfants de la Guerre (TF1). The date is 27 November 1996.

Related links:

Full Post + Comments

Two New Moodle Versions in One Day

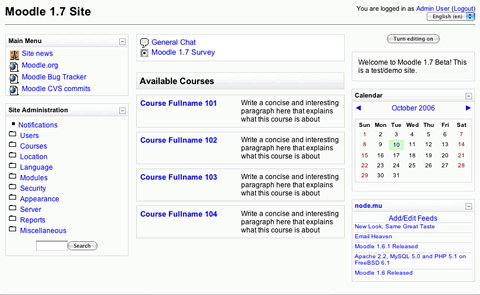
Moodle 1.7 Beta

Martin branched Moodle 1.7 from CVS HEAD today and announced the release of Moodle 1.7 Beta. This is a beta release, and is not recommended for production sites. The release notes has a list of the headline features for this new version:

  • Roles
Permissions based on fine-grained capabilities allow all kinds of roles to be created and assigned in all contexts around Moodle. This creates a great deal more flexibility in the permissions that you can grant to people.
  • XML database schema
Added support for MS-SQL and Oracle with more databases to come. Developers now have just one XML file to edit when changing the database structure, and there is even a very funky editor for this file built into Moodle
  • New Admin interface
Completely new admin interface, with accessible design and cool features to make access to settings fast and easy.
  • AJAX Course editing
The Topics and Weekly course formats now feature AJAX editing which means you can drag drop blocks, activities and sections (weeks/topics) and it all happens instantly. No more page reloading!
  • Unit testing framework
Making it easier for developers to write test code, which should ultimately lead to a more reliable Moodle.

Give it a spin, throw upgrades and course backups at it, and report any issues on our new bug tracker, my home for the the next few weeks!

Moodle 1.6.3

A new minor version of the current stable branch has also been cut. Moodle 1.6.3 is mainly a bug fix release. A list of improvements can be found in the 1.6.3 release notes.

As usual, you can grab the files from download.moodle.com.

Full Post + Comments

New Look, Same Great Taste

FreeBSD Logo

I have migrated this blog over to the new VPS. This site is now powered by FreeBSD 6.1.

I’ve also finally upgraded to WordPress 2.0 and while I was at it, I decided it was time to get rid of the default theme. I worked on some design concepts for the new look, but in the end I decided to keep things simple and lightweight. The current theme is a modified version of K2 Beta Two by Michael Heilemann & Chris J Davis.

I have also done some reorganisation. The preferred address for the blog is now http://blog.node.mu. I know, I know, good URLs don’t change. I’ve made sure that all the old permalinks still work as before. I am just doing this now so that I can switch things around at some time in the distant future.

Expect some changes in the coming weeks. I’m not done yet.

Full Post + Comments

Email Heaven

I have just migrated my email over to a new VPS. Okay, a not-so-new VPS. I’ve had it for a while, but it’s only now that I’ve gotten around to taking care of the email migration. I love IMAP. I seriously don’t think that I could ever go back to using POP for my email.

I love the Maildir format too. Just tar the the Maildir directory, copy over to the new server, untar it, change the A record for mail.node.mu to point there, and BAM – everything works transparently. There’s no need to reconfigure the email client.

I got a Sony Ericsson M600i on Tuesday, and it’s making me appreciate IMAP even more. I usually receive emails from two high traffic lists: the moodle.org forum posts, and the Moodle cvs commits list. I have these emails filtered to different folders. My phone is not subscribed to these folders. There’s not much value in having these emails go to my mobile phone because:

  1. I’ll have to pay more for the data transfer
  2. If I’m reading emails on my phone, it means that I don’t have my notebook with me anyway.

Now all I need is for Apple to release an updated version of iSync with the coming OS X 10.4.8 update, and I’ll be a happy M600i user.

Full Post + Comments

Moodle 1.6.1 Released

Moodle 1.6.1 has been released four days ago. See the release notes for the change log. 1.6.1 is mainly a bug fix release. You can grab it from download.moodle.org.

Full Post + Comments

Apache 2.2, MySQL 5.0 and PHP 5.1 on FreeBSD 6.1

Way back then, I wrote a tutorial on how to set up a FAMP server. Some things have changed since then, and this tutorial gives a quick run down on how to do it today. I have tried to explain the whys as well as giving the steps. Installing FreeBSD is beyond the scope of this tutorial. So let’s wave our magic wand and say that your server has just rebooted into a fresh minimal installation of FreeBSD 6.1.

There are three ways to install software on a FreeBSD system. You can do everything from ‘first principle’: download source code, compile and install. The second way is to use pkg_add to install pre-built binary packages. pkg_add is able to resolve dependencies and it will automatically download and install these as well.

The third way is to use Ports. The Ports Collection is a set of makefiles, patches and description files placed in /usr/ports. To install a port, you just need to browse to the relevant subdirectory and type ‘make install’ For example:

cd /usr/ports/editors/vim
make install

This will tell the Ports System to download the vim source code, compile and install it on your system. You are given the chance to choose from a set of compile time options if there are any. The Ports System is able to resolve dependencies too.

We will be installing the required software from ports because it gives us both flexibility (we are able to select compile time options) and convenience (it resolves dependencies and fetches the source code for us). Software installed from Ports can also be upgraded easily.

Let’s use Portsnap to make sure that we have the latest snapshot of the Ports Collection. Portsnap is a system for securely distributing the Ports tree. On a brand new installation of FreeBSD 6.1, as root:

portsnap fetch
portsnap extract

You now are the proud owner of an up to date Ports Collection. From now on, if you want to update your Ports tree, just do:

portsnap fetch update

More information on Portsnap can be found in the relevant section of the excellent FreeBSD Handbook.

You can use cvsup as an alternative to Portsnap. However, Portsnap snapshots are cryptographically signed and the system uses less bandwidth. You can use pkg_version to check whether you have any outdated ports on your system:

pkg_version -v

To update all the outdated ports with one command:

portupgrade –a

portupgrade –ai will ask for confirmation before updating each port. If you don’t have portupgrade installed, you can install it by doing:

cd /usr/ports/sysutils/portupgrade
make install

It is also a good idea to do

make clean

This gets rid of the working subdirectory that contains the temporary files during compilation. This can be shortened to ‘cd /usr/ports/sysutils/portupgrade; make install clean’. More information on how you can keep your system up to date can be found here. Now that we have an updated Ports Collection, let’s get down to business.

Install Apache:

cd /usr/ports/www/apache22
make install clean

Install MySQL:

cd /usr/ports/database/mysql50-server
make install clean

Configure the php5 port:

cd /usr/ports/lang/php5
make config

Deselect option CLI. Selecting to build the CLI version rendered php apache module unsuable for me for some reason. A quick googling around told me that I was not alone in having this problem.

Install PHP:

make install clean

Install PHP extensions:

cd /usr/ports/lang/php5-extensions
make install clean

Just choose what extensions you want to install. Install the php5-mysql extension:

cd /usr/ports/databases/php5-mysql
make install clean

Let’s start our new daemons:

/usr/local/etc/rc.d/apache22.sh start
/usr/local/etc/rc.d/mysql-server start

You should now be able to browse to your web address and see the cheerful exclamation: ‘It works!’ To make sure that Apache and MySQL start whenever the server is rebooted, add these lines to /etc/rc.conf:

apache22_enable="YES"
mysql_enable="YES"

Software installed through ports will have their configuration files in /usr/local/etc. The base system configuration files live in /etc. This makes for a clean, consistent filesystem layout. Let’s configure our newly installed software.

To make Apache PHP-aware, add the following lines to /usr/local/etc/apache22/httpd.conf:

AddType application/x-httpd-php .php
AddType application/x-httpd-php-source .phps

Go through the configuration file and customise to your needs. The PHP port has created a php.ini-recommended file for us in /usr/local/etc/. Let’s use that as a starting point:

cp /usr/local/etc/php.ini-recommended /usr/local/etc/php.ini

Now edit /usr/local/etc/php.ini to suit your needs. Restart Apache to apply the configuration changes:

apachectl graceful

By default, no password is set for the MySQL root user. You should set a password for that user at this point:

mysqladmin -u root password "newpassword"

Replace “newpassword” with your own. MySQL comes with two anonymous accounts set up. These accounts don’t have any passwords assigned by default. It is a good idea to just delete them. Use the MySQL client that came with the database server:

mysql –u root -p

When asked, type in your newly created database root password. At the MySQL prompt, issue the following command:

delete from mysql.user where user = '';
flush privileges;

To exit from the MySQL client, just type ‘exit’.

That’s it! I now suggest that you take a look at the output of phpinfo() to make sure that everything is in order.

Full Post + Comments
Moodle 1.6 Released

After going through five beta versions, the wait for Moodle 1.6 is finally over. Martin released 1.6 last Tuesday (download, release notes).

Moodle is an open source Learning Management System (LMS). Here are some resources to get you started:

The best way to get involved in the community is to create an account on Moodle.org and join the Using Moodle course. If you want to test drive Moodle, I have set up three test/demo sites that I keep up to date with the latest code from the corresponding CVS branches:

<th>
  Description
</th>
<td>
  Moodle 1.5.4 is the previous stable release. This site tracks the 1.5 stable branch in CVS.
</td>
<td>
  Moodle 1.6 is the current stable release. This site tracks the 1.6 stable branch in CVS.
</td>
<td>
  This site tracks the development branch of Moodle, the latest bleeding edge stuff from the CVS HEAD branch.
</td>
Site
Moodle 1.5.4+
Moodle 1.6+
Moodle 1.7

Feel free to create user accounts and to poke around.

Full Post + Comments

Catching Up on My Reading

Recently I have accumulated a number of bookmarks “to be read later”. Tonight I sat down to read some of them. I revisited CakePHP and I also read a nice article about storing hierarchical data in a database.

I first thought about trees vs RDBMSes when we were designing the Bam CMS. Websites are inherently tree-like in structure. However, a CMS will usually be storing data into a relational database.

The article describes the Modified Preorder Tree Traversal algorithm. The main attraction of this algorithm is that retrieving a node in the tree (a page in the website) requires only one query to the database. Updating the nodes is more expensive, but in a CMS situation, you tend to have many more page requests than page moves/additions/deletions.

I also wandered over to the CakePHP website and read through the new documentation. It seems that a lot has happened since I last looked at the framework. 0.10 Final has been released and the documentation and overall activity has picked up. It is now much easier for a developer to get up to speed with the framework. For those not familiar with CakePHP, here are the goodies:

  • MVC Pattern
  • Sane file layout
  • Pretty URLs
  • Easy installation and upgrade of the framework
  • Convention over configuration
  • Scaffolding
  • Access control lists
  • Helpful helpers: html, ajax etc.
  • Add your own helpers easily

Like Ruby on Rails, but need PHP? Look into CakePHP. It may be a steep learning curve if you are not familiar with the MVC pattern, but it is worth it. Since the framework, like RoR, favours convention over configuration, it takes a while to get used to the way things are done. Hint: it is easier to go with the flow. Work with the framework, do not fight it. The net gain is consistency and discipline. PHP is a great language, but it is so easy to write crappy code with it if one is not disciplined. A good framework will encourage good habits and highlight best practices.

CakePHP essentially takes the pain out of writing PHP. The framework takes care of sessions, has object relational mapping, makes form building and validation easy, and makes data sanitisation a breeze. The small headaches of day to day PHP fade into the background, leaving you with the more interesting tasks to concentrate on.

Full Post + Comments

Two Weeks with a PowerBook

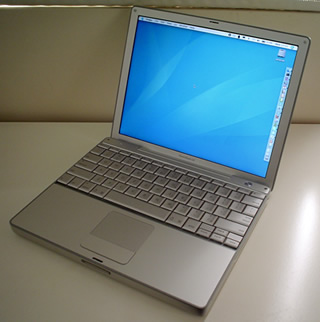
I have now had my PowerBook for a little more than two weeks. Like I said in my previous post, I am very impressed with the design and build quality of the machine. First, the obligatory photos.

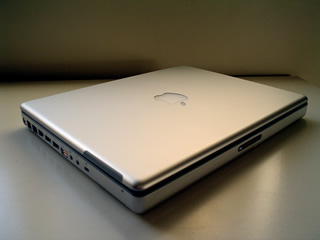
PowerBook with lid closed.

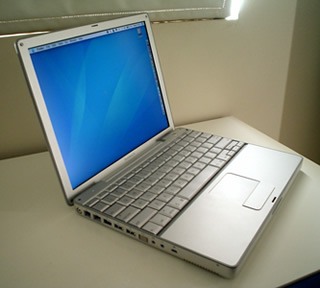
PowerBook with lid open, from left hand side.

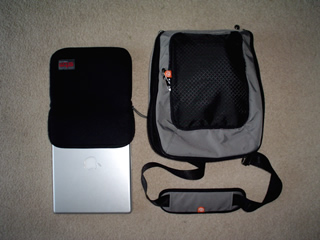
I bought an STM glove and a booq Mamba XS laptop bag to carry the notebook around. If you own a 12″ PowerBook, you should make sure that the glove is actually made for the PowerBook. Don’t buy the gloves that say they fit both the 12″ iBooks and PowerBooks. The PowerBook is smaller than the iBook and these gloves won’t fit nicely.

PowerBook, STM glove, booq bag.

Everything is outstanding, except for the screen quality, which is pretty average. I usually plug in an external monitor when at work and at home. On the move, the 12” lcd is adequate. The 12” PowerBook shares the same screen as the 12” iBook. The other PowerBooks have better quality screens. The MacBook Pro apparently has Cinema Display quality screen. I knew all this before I bought the notebook, but I was not willing to carry a bigger laptop around. Here’s to hoping for a better screen on the 13.3” (or whatever it ends up being) MacBook Pro. The arrow keys are also too small and it takes a while to get used to them. If you look closely at the following photo, you will notice that the arrow keys are half-height so that they are flush with the lower end of the keyboard.

PowerBook from top, right hand side.

There are a few things that I had to get used to:

  1. To go to the end of a line, you need to press command+right arrow key. Likewise, to go to the beginning of a line, you need command+left.
  2. The delete key is basically backspace. To delete to the right, you need fn+delete.

For my usage pattern, the 512MB of RAM that the notebook ships with is the bare minimum to run OS X comfortably. I have since upgraded the memory to 1.25GB and things really fly now. The UI in general feels a little slower than Windows XP and KDE, but faster than Gnome. Purely subjective, of course. Windows XP would be more bearable on a machine with 256MB of RAM than OS X. However, throw more RAM at OS X, and it seems to make better use of the extra memory. Once you start having lots of applications running, OS X doesn’t seem affected whereas the hard disk starts trashing in Windows. Anand Shimpi attributes this to the more aggressive caching in OS X.

Window management is completely different in OS X. There is no taskbar, and any attempt to use the dock as your window management tool is likely to slow you down and lead to frustration. Instead, you should manage windows spatially. Get over the fact that any application that you are not using should be minimised, and get over the fact that you should maximise the application that you are currently using. Let the screen(s) clutter up, and use exposé to find the window that you need. With the higher resolution displays it makes more sense to adopt this approach anyway. You can also alt-tab you way through the windows. However, unlike in Windows, you can use your mouse to select the relevant application while doing that. Another way to manage your windows is to close (command+w) any application window that you don’t immediately need. Closing a window will not quit the application. Some applications I never quit – they just remain closed out of sight if I am not using them: the terminal, safari, mail.app, iTunes and IM clients. I will still be alerted if an email or an IM message comes in. And accessing them again is instantaneous since they are still running in the background.

Shortcuts are also plentiful and are the recommended path to nirvana. Some shortcuts that are used in Windows, KDE and Gnome have equivalents in OS X. Except that you use the command key instead of ctrl. Command-c copies, command-v pastes, command-q quits, etc.

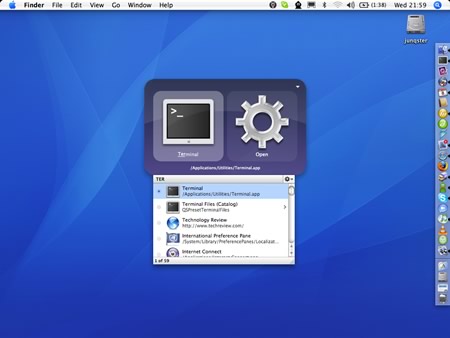
Command+space will bring up spotlight. Spotlight is basically instantaneous, system-wide search. It’s so fast because it indexes meta data every time you create, save, move, copy or delete a file. Spotlight can search through your applications, system preferences, as well as documents, emails, IM messages, etc. You can use it to quickly launch applications without having to touch your mouse. Hit command+space, type in “ter” and spotlight instantaneously finds the terminal app. Just arrow down and hit enter. Quicksilver is also a nice application launcher. I have bound option+space to bring up Quicksilver and I have it configured to search for applications first. I use Spotlight as the general search tool and Quicksilver as my application launcher. The following screenshot shows Quicksilver in action.

Quicksilver in action.

If you come from a *nix background and want a pager, Desktop Manager is a nice, free pager. The transitions while switching desktops are cool too.

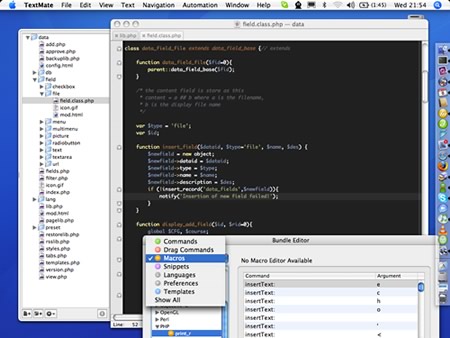
My new editor of choice is TextMate. I still had 17 days remaining out of the 30 day trial when I decided to buy the license. I love the fact that it can be launched from the terminal. I don’t use the finder while coding these days. The terminal is faster and I can also use grep & co. to boot. TextMate has a minimalistic UI and does not get in the way. You won’t find tons of menus/toolbars. As you grow into the editor, you learn the shortcuts and start using macros. Think vim with a modern GUI that has code folding, tabs and project directory browsing. I won’t get into too much details. Raving about TextMate is a bit like raving about Ruby on Rails. It’s all over the web. Okay, maybe I’m exaggerating, but I’m sure that this would be true if TextMate was also available for Windows and *nix. Here’s a screen grab of TextMate:

Screen grab of TextMate.

If you are a long-time Windows user and you miss having the start menu to launch applications, just add your Applications folder to your dock. You will then be able to right-click (or ctrl+left-click, or left-click and hold) on its icon to get a menu with all your applications. This will also enable you to keep only the most used applications in your dock to keep things tidy. You can add any folder to your dock by dragging it between the trash can and the dark line that separates the trash from the rest of the dock icons.

I don’t consider myself as an OS X power user yet. Feel free to drop me a line if you have any tips or any suggestions for killer apps :-)

Full Post + Comments